 |
| Bloggers for Charity |
Tuesday, 28 May 2013
A Nice Idea
You may have seen this pop up on other Blogs (I followed the link from Wargaming Girl). But thought I would add it here to show support.
The plan is to put on a French and Indian War game at Triples in 2014, to raise money for 'Help the Heroes' and 'Men Matter' (prostate cancer). Any way go to the Blog to read all about the plan/game etc.. Here is the link again....bloggers for charity.
Wednesday, 22 May 2013
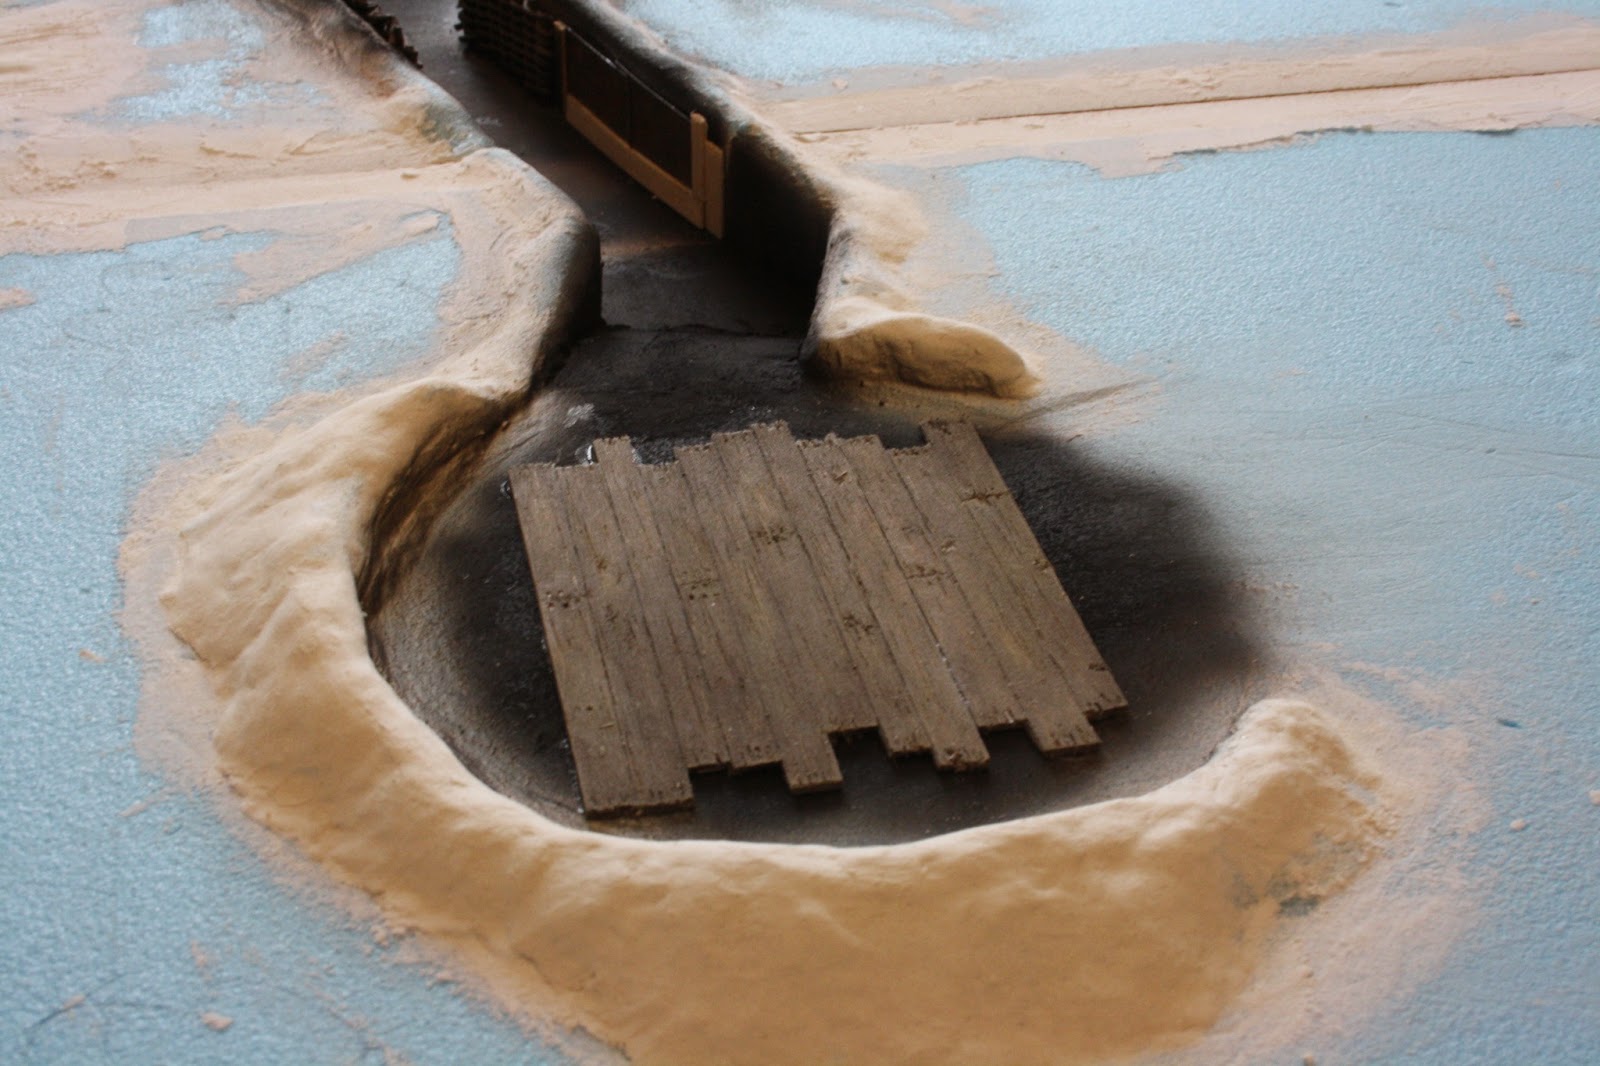
Building the Brecourt Gun Battery (Part 3a(?))
I've steadily been working on the four boards which will make up the area for the 'Brecourt Manor Assault'. Building the sides of the trenches has been the main priority.
The communication trench does not feature in any accounts I have read but decided to add it, purely for aesthetic value. Though it will also be an entry point for any German reinforcements.
I'm using a mix of balsa and coffee-stirrers for the revetments. The idea being that when painted it will give variation in shade between the different pieces of wood.
The ammo bunker was originally going to be completely modelled onto the board, but I then decided to indicate the entrance to it only. Realistically I very much doubt, it would figure in play as a real bunker i.e. a place of safety. The piece of corrugated iron sheet to the right of the entrance is made from molded plastic. I've discovered that the Evostik wood glue used to attach the two uprights to the corrugated sheet does not dry clear over the MIG Pigment Fixer applied over the weathering powders on the plastic sheet. The wood glue has left 'tide marks', which should be repairable but something to bear in mind in future. Remember and make sure to wipe away any excess glue if mixing these two products. Otherwise as per usual the Evostik wood glue did a wonderful job.
The walls for the command bunker are made entirely from balsa wood.
One of the MG nests which are on the rear of the boards. The damage to the styrofoam in front of the position was caused by airbrush cleaner accidentally spraying onto the foam. So a second learning curve; when using this product, be careful what gets onto it otherwise hard work could be undone! I'm sure the foam melted because the cleaner was sprayed from an aerosol can, but caution is advisable.

I have started to add in the 'duckboard' flooring for the trenches. Once that is done then I intend to paint all the wood and then move onto adding some more detailing before painting the boards proper.
 |
| Command bunker between Gun 2 & 3 |
 |
| Communication trench between guns 3 & 4 |
 |
| Looking down the communication trench |
 |
| Entrance to ammo bunker |
 |
| Command Bunker |
.jpg) |
| MG nest |

I have started to add in the 'duckboard' flooring for the trenches. Once that is done then I intend to paint all the wood and then move onto adding some more detailing before painting the boards proper.
Friday, 10 May 2013
Building The Brecourt Gun Battery.....Part 3
The work slowly creeps forward!!!
.jpg)
I've added ready mixed filler to hide seams, cracks and holes. Then gone over the 'earth' ramparts with modelling clay to give more shape to the structures.

I've also added in the wooden gun platforms. For the gun pits these have been made from sheet balsa, scored to represent the individual planks of wood and then distressed and painted. I painted these before gluing to the board. Balsa takes the paint well, soaking up the initial grey wash and then a black wash and then dry brushing with suitable lighter colours to highlight detail. For the trench sides I'm using a mix of coffee stirrers and balsa. The coffee stirrers/lollipops, do not soak up the paint like balsa.

The floor of this MG nest, is made from individual coffee stirrers. I found it was easier to apply a black wash to these, then a grey wash and then drybrush. Slightly more time consuming cutting individual lengths of wood and then distressing them, than working on a 'block' of balsa sheet. The wattle fencing is home made.
.jpg)
The wattle fencing was very time consuming, but does the job. After first pieces were glued in position, I realised the blue of the foam board could be seen. So I then went over all the trench/gun positions with black paint. Applied with an airbrush! Then glued in further pieces. The fencing has then been sprayed with various shades of brown, again using an airbrush. More work to do on these yet.
I need to finish off the trench sides and flooring, and then will nearly be ready to paint the surface of the boards.
.jpg)
I've added ready mixed filler to hide seams, cracks and holes. Then gone over the 'earth' ramparts with modelling clay to give more shape to the structures.
I've also added in the wooden gun platforms. For the gun pits these have been made from sheet balsa, scored to represent the individual planks of wood and then distressed and painted. I painted these before gluing to the board. Balsa takes the paint well, soaking up the initial grey wash and then a black wash and then dry brushing with suitable lighter colours to highlight detail. For the trench sides I'm using a mix of coffee stirrers and balsa. The coffee stirrers/lollipops, do not soak up the paint like balsa.

The floor of this MG nest, is made from individual coffee stirrers. I found it was easier to apply a black wash to these, then a grey wash and then drybrush. Slightly more time consuming cutting individual lengths of wood and then distressing them, than working on a 'block' of balsa sheet. The wattle fencing is home made.
.jpg)
The wattle fencing was very time consuming, but does the job. After first pieces were glued in position, I realised the blue of the foam board could be seen. So I then went over all the trench/gun positions with black paint. Applied with an airbrush! Then glued in further pieces. The fencing has then been sprayed with various shades of brown, again using an airbrush. More work to do on these yet.
I need to finish off the trench sides and flooring, and then will nearly be ready to paint the surface of the boards.
Subscribe to:
Posts (Atom)