Showing posts with label 20mm. Show all posts

Monday, 1 February 2016

Merkava 1

First AFV for this 'new' project completed. An Israeli Merkava Mk1.


Built this from the old Italeri 1/72 scale kit. Not a bad kit but needs modernising. The wheels come in one piece and the track though well moulded on the outside has no inner guide teeth. So I replaced the wheels and tracks with resin aftermarket products from Model Miniature. These worked out nicely. But there was one problem.

The wheels from Model Miniature sat too far back on the connection tab. A quick look at the supplied wheels and the problem was solved. The Italeri wheels have an attached lug which 'pushes' them forward. So about thirty minutes, after a bit of cussin' and swearing, I had removed the excess from the dozen Italeri wheels with a very fine razor saw. Then used the off cut like a washer to bring the resin wheel forward.

Italeri wheel before and after cutting
MM wheel plus plastic 'washer'
The wheels now lined up with the resin track guide teeth. First time I had used resin tracks. Was not too horrible an experience. Glued three lengths together. Placed said lengths on bottom of wheels so they were roughly equal overhang front and back. Then used hairdryer to heat resin and bend round idler and drive wheel. The tracks did not meet in the middle but since I was using track guards this would be hidden on the finished model and not a problem.

Added a few extra features to the kit. The aerials are from RB Model. The tow cable is one I bought for Russian tanks from Eureka xxl. You can pick these items from UK distributors should you wish too.


The photo etch grill in the turret bustle is from Scalelink. I used 1mm diamond grid pattern. I used lead foil from them to represent the canvas with the platoon number displayed. I also cut small pieces of styrene channel to put around the turret bustle to use as brackets to hold the tow cable.

The extra track links on the turret are pieces of the original track but added guide teeth to both and the bolts to hold them in place.


First time I've really added some scratch built parts to a kit and despite being fiddly at times was actually quite fun. The green you can see is filler.

IDF tank colours seem to have as much discussion as German WW2 tank colours. In the end I used Vallejo Model Air Sinai Grey '82. The name helped! The weathered away.


So I have a tank of the 1st Battalion (single white ring around gun barrel), 2nd Company (forward pointing arrow head on side skirt) of the 1st Platoon (Numeral one on canvas placard).


Really enjoyed building this. Next up for the IDF some more infantry and another tank.

More to follow soon.....

Thursday, 21 January 2016

IDF. Lebanon 1982

So this is the new project I have embarked upon. The First Lebanon War or Operation Peace for Galilee.

Not going to go into the ways and wherefores yet. But first up is an Israeli Infantry/Paratrooper Squad in 20mm of course.


These first five are from Elhiem.


These five are from Underfire Miniatures.

Kept the colour scheme simple, which made them very enjoyable to paint.

I decided to give them brown boots which I believe was the trademark of IDF paratroop units. I will probably be using the term 'I believe' alot throughout the following posts concerning the IDF and opponents. I'm learning as I go along. One of the enjoyable aspects of the hobby.

That's it for now more to follow so.....

Tuesday, 19 January 2016

An Interlude Filler

I will be posting soon about my new project for 2016 (ooh exciting!). But until then here are some very simple fields I made before Xmas 2015 for use with 20mm figures.


Each is about 20cm square. I used the old favourite of the doormat. Gave the top half a rough spray of Vallejo Air Light Camo Green. The row of crops are from Mininatur/Silfor. The goats come from the Pegasus 1/72 scale Farm Set.

The main ground covering is ready mixed filler but at the edges I mixed filler with PVA and that set rock hard. So should protect the edges from any hard knocks.


With a T54 to give an idea of scale. The T54 is from a previous post but slightly modified.

That's it for now more to follow soon...

Friday, 8 January 2016

I'll huff and I'll puff and I'll knock your house down

Catch up time. To kickstart my return to the blogging circuit I'll start by posting up some things I've done recently.

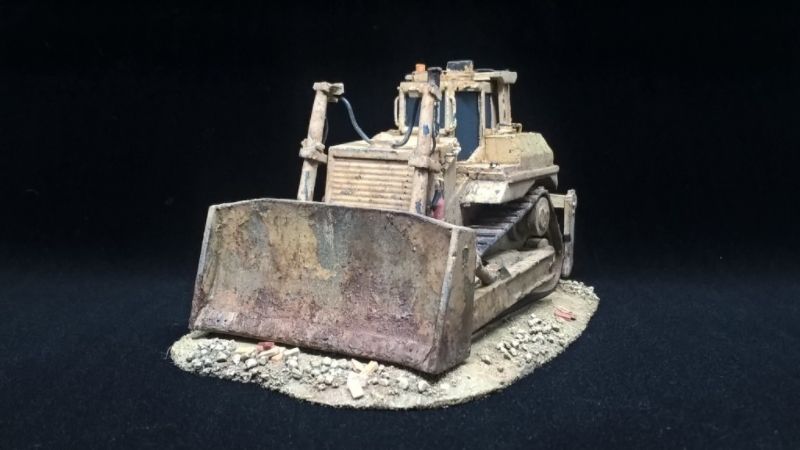
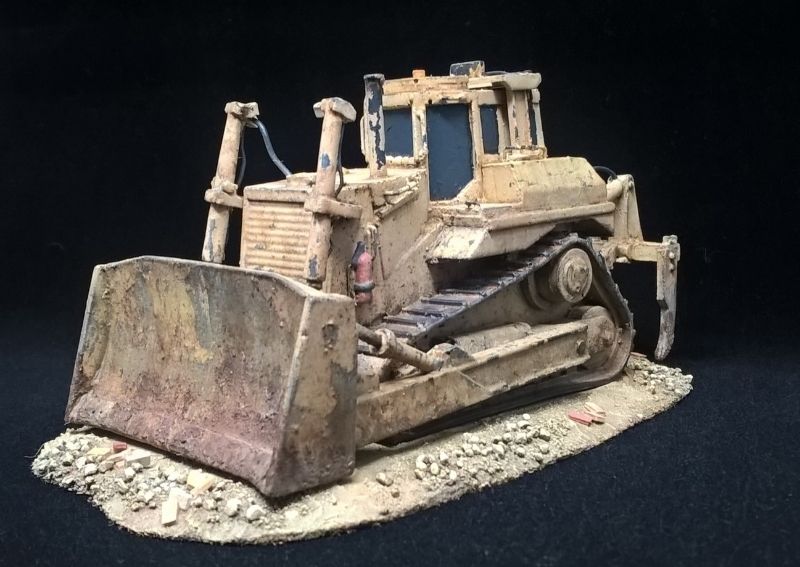
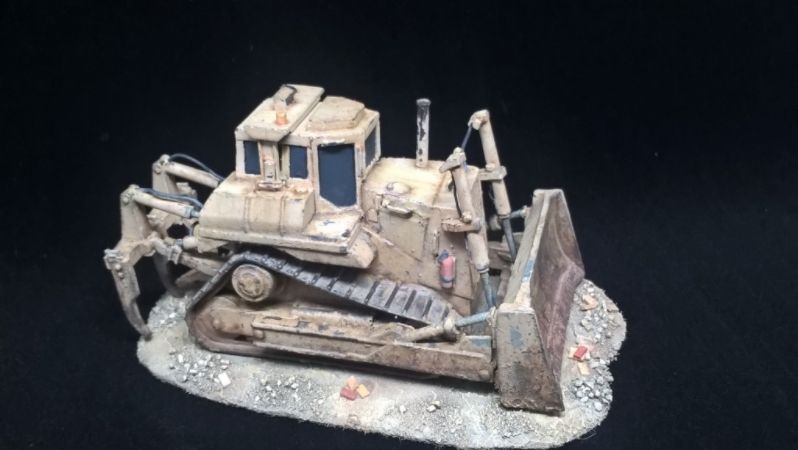
First up D9 bulldozer from SandSmodels in 20mm scale. It's not in the store yet. But I saw it on their Facebook page here. So when I placed an order for another item, asked Shaun about it and he kindly sent me out a model.


I've added cables for the hydraulics, grab handles, fire extinguishers, amber warning beacon and the aircon/heater unit for the cab. Built up some areas with plastic card. Added some card to the base of the blade to bulk it out more and around the cab deck. Then it was a case of weathering it....heavily.


I've painted it to represent a vehicle used by US forces. I could not figure how to make the grill which sits over the blade or to add the headlamps which sit above the two blade arms. Fortunately I did find a photo on the net, of two US Army D9's parked side by side and one was missing the grill above the blade.


Overall I'm pleased with the result. Had a bit of a 'mare with the painting though. Decided to try out MIG Ammo Scratches fluid in place of my normal hairspray. I learnt to my cost that you can't leave the chipping fluid overnight to dry like hairspray. So I ended up having to reapply a base coat. This means if you look closely some of the detail is covered a little to heavy in paint. Live and learn! 

I didn't weather it heavy to hide these mistakes but to give it a real work horse look. Honest!:)

Anyway that's enough for now more to follow...


Thursday, 30 July 2015

Pimp my ride!

A while back I posted about the first of several LAV-25's I intend to build. That post can be found here.

Now if you read yesterday's post (if not go and read it now :)), clearly visible in photo in the background is the very same LAV. For the past few days I've been 'enhancing' the model. I was just not entirely happy with it, and decided it needed further weathering.

So this is what it looked like originally...


Now this is the updated version...


I've added more dust and paint scratches primarily. This time I took more care by adding a layer of dust streaks for example, sealing with varnish and then adding another layer to build up the appearance.

I'm much happier with it's appearance now and I very much doubt I will tinker with it any more. Though I have made an error. Looking back at my source photo's the barrel of the Bushmaster cannon always seems to be black. I'll probably leave this one green and make sure I get it right next time.


Next I intend to 'pimp up' the T-72M1.

That's it for now more to follow soon.....

Thursday, 23 July 2015

Eat yer heart out 'Grand Designs'!*

This has kept me occupied for for the last couple of weeks. Another building for my Modern games, but with a slight twist.


Been collecting the bits and pieces to make this scene for a while. The building accoutrement's and paraphernalia come from 1/72 wargaming and OO scale railway sources. The building itself is 2mm MDF for the floors. The ground floor mounted on 3mm cork tile. The walls are 3mm cork sandwiched between embossed plasticard. The concrete uprights are 8mm square pine dowel cut to 80mm lengths and are covered in base render. 0.5mm copper wire used to represent the steel reinforcing bars.


To make up for the lack of walls building materials have been 'strategically' placed to provide cover.


The first floor can be removed to allow access to the ground floor. The ladder being used in lieu of a proper staircase is glued in place to the first floor, but will require careful handling. The oil drums at the back are there to provide some cover but I wanted much of the building to be open to make an interesting feature on the gaming table.


Since my background is not in the building trade or architecture I can only apologise if anyone believes that the structure would fall down in the reality. I did some research to get an idea of materials used in building houses in the Middle East, and used reference photos as a basis for the model. But it's for wargaming so as long as it's practical for  gaming purposes then it's a success. 


I may add in a few more small features at a later date but for now it's complete.

That's it for now more to follow.....

*Grand Designs is a UK TV show about people who build generally large and unusual homes. I don't tend to watch it. Pretentious nonsense!

Tuesday, 21 July 2015

The News at 10

Reporting from the frontline....


Created a small vignette for my on the scene news crew.


It was the best way I could come up with to make the figures more interesting. Had originally planned to base them individually on 1p coins like everything else. This way they should stand out in the crowd.


They are on a 40mm MDF circular base (from Warbases of course), with another cut in half and glued on top. Used green stuff to cover the pavement area and then carved in the individual slabs. Sculpture is not my strong point (though I can do a mean sandbag!), so put other pieces of detritus on top to hide any mistakes and draw attention away from wonky lines and different widths and depths between the paving slabs.


Overall though I'm happy with the finished product. The figures are from Elhiem. The reporter appears to rocking back on his heels in the close up photos. I did not really notice it when pinning the figure to the base. I also meant to pin the cameraman so he was 'filming' slightly more to the right of the reporter to offset the difference in height and give an illusion he was filming events behind his colleague, I only realised my error after the glue had dried. Oh well nevermind, life goes on.


That's it for now more to follow.....

Friday, 17 July 2015

Back on the Road Again....

Mojo back....Check
Painting time back....Check
Plenty to paint....Check
Know where to start....Check
Stop faffing and get on with it.....Check

Back to the 20mm Moderns at the moment. Bursting with enthusiasm. Much to do. To begin with nothing to exciting. But completed a group of nine of Elhiem Figures excellent Shadow Army figures. These sat on the workbench for about 6 months. Started them full steam ahead but then lost interest. Finished them a couple of weeks ago. They are great figures.


These consist of two packs of TAL26 and one of TAL32. Since I'm concentrating on OIF not OEF, I intend to use them to primarily represent foreign/veteran fighters in games. Their distinctive attire should make them more noticeable on the tabletop. 


That's it for now more to follow.....soon!

Sunday, 8 February 2015

Technical with ZPU-1

So I took this.....


A 1/72 scale Cararama Ford F150 pick up truck and turned it into this.....


A 'technical' mounting a ZPU-1 14.5mm AA HMG. The gun and crewman are from Elhiem and can be found in the 'Weapon Sets' and 'Insurgent' ranges respectively.

Took the diecast vehicle apart and and airbrushed the body and rear bed black. Then painted and weathered it all before reassembling into the completed model. The wheels, front and rear bumpers have not been painted only weathered and I left the interior alone. The plastic windows were weathered buy airbrushing AK Interactive Dust Effects, after masking off the windscreen to represent the movement of the wipers, and then sealed with Johnsons Klear.

After the painting etc., was finished I applied the final coat of varnish to the separate pieces before putting all back together. The windscreen was not varnished again to avoid any fogging.


I had not originally intended to use the ZPU gun on a pick up. I was going to mount it on a base to be used as a fixed emplacement, to engage air and ground targets. As described by Bing West in his book 'The March Up' when flying over Al Budayr and the helicopter is targeted by heavy MG's hidden amongst residential buildings.

The beauty of these diecast models over the resin pick-ups which are available, is that the rear tail gate can be lowered. The pick up had been purchased to use as a civilian vehicle to add another piece of terrain but after test fitting the tripod gun stand and it fitted then rear bed, the two had to become one.


There are plenty of photo's on the web of these weapons being used on pick ups. Though I used Meng Models 1/35th scale Technical with ZPU-1 as inspiration. Of course there are the photos of the Texas City plumbers truck which was sold three years ago and turned up in Syria still displaying the company logo.


Have not based this one yet, not sure if a will. The wheels have not been glued in place so still turn like they do on all good diecast models!

That's it for now more to follow..........