Friday, 9 September 2011

Woodland Indians

A while back I posted a few pics of some Eastern Native American warriors or Woodland Indians. Well I have completed  a few more for my French & Indian War project (which is sputtering along).

My recent involvement in a AWI campaign sparked my interest in the period again, plus I decided I needed a break from painting WW2 (couldn't face doing any more splinter camo just yet).

Four more.


  With the original two.

I've used mainly GW colours on these with some Vallejo and Foundry. I've also simplified the paint schemes opting for more natural 'buckskin' for clothing and accoutrement's, rather than spending time painting ornate schemes on the bags etc. to represent the decoration of bead work etc.

These figures are Conquest Miniatures. But these particular figures are no longer available unfortunately.

Lack of Updates

Been a liitle busy the last couple of weeks. Mainly because of these two tykes...
Proud owner of two English Spring Spaniel pups. These two are now approaching eleven weeks of age. For me painting toy soldiers etc. as to take a back seat for a while. But not too far to the back.....

Wednesday, 10 August 2011

Fallschirmjager Squad One

Drum roll please......

At last the first Fallshirmjager squad completed. Ten figures with a MG34 team and a MG42 team. All figures from Artizan.

The squad leader is the figure in the tropical trousers. A veteran of North Africa or Italy maybe?

 I only gave this figure the tropical trousers to make him more identifiable on the table top. I can honestly say that painting German splinter camo is a bitch. I did try and make the green and brown pattern small so it would be more authentic, but the figure looked to fussy. In the end I decided on painting large(ish) geometric designs (the brown pattern larger than the green), to give an illusion of the pattern and which left more of the tan base colour showing through. For the 'rain' I eventually settled on using GW's Orkhide Shade, which is a nice dark green and a 'OOO' brush plus a steady hand (and sometimes not so steady).

On to the next squad. Hurrah!

Saturday, 16 July 2011

A few more Fallschirmjager

A quick update on the progress of the Fallschirmjager. A few more completed.


I decided to go for the 'lazy boy' approach to these and not paint camo smocks. The trousers on the rifleman have been painted using the Foundry 'Storm Green' palette. The MG34 gunner I used for his trousers, GW Charadon Granite, highlight, Vallejo German Field Grey and finally Foundry Storm Grey the mid colour only) as the final highlight. I'm happy that both colour schemes give that late war field grey effect.

Even attempting to paint them quickly by cutting down the complexity of the paint scheme, each figure is about three hours work. Having usually on average about hour to an hour a half painting time a day (and then not every day), means it takes me a while just to get a squad done, but I'm getting there. As usual figures from the excellent Artizan range.

Sunday, 26 June 2011

Another Fallschirmjager

Yet again a test figure;


This is another Artizan Designs Fallschirmjager, but this time I've painted the smock in the traditional grey/green. I've used Foundry's Granite paint pallette, which I'm quite happy with. These is plenty of contemporary photographic evidence that Fallschirmjager were still wearing these smocks. Osprey Publishing Men-at-Arms No 139 'German Airborne Troops 1939-1945, on pages 30 and 36 has photographs of paratroopers in both Italy and Normandy wearing these smocks in 1944. But other than coloured drawings, I had never seen (or not that I can recall) a colour photo of this style of smock.

That was until After the Battle No 152 arrived on the door mat. This issue has articles on the Liberation of Rome in 1944, but begins with the German seizure of Rome in September 1943, after the Italian armistice. On Page 3 is a colour photo of Fallshirmjager of the 2nd FJ Division, taken in Rome, and the majority of paratroopers in the photo are wearing the grey/green smock. I used this photo as a colour guide, and I think the Granite pallette is not too far out. The German attack on Rome and the sporadic fighting with Italian forces would make an interesting and different wargame scenario(s).

The helmet on this figure I have painted dark grey and then sponged on desert yellow again. I knew I had seen a colour photo of this scheme but could not recall where. Until I remember this: Trigger Time, Mark Bando's site for the 101st Airborne Div., scroll down the page on the link and hey presto FJ helmets. Interestingly I was closer with my first attempt in painting the base colour Vallejo Field grey (which is a dark green).

Now I must decide whether or not to adopt the 'lazy boy' approach to these FJ and paint a batch in grey/green smocks, which will be quicker than doing the splinter camo smock. Then add in figures in camo smocks later, to build up the force?

Friday, 17 June 2011

Fallschirmjager

Well after a bit of a hiatus, I've finally got round to doing some painting. Ta-da.......


My first ever Fallshirmjager. As always a test figure first, so I can decide on colours and techniques. This model has been mainly painted with Foundry colours, from their palette range. Some Vallejo and GW colours used as well. The uniform/smock is all Foundry. The trousers are 'Late WW2 Field Grey', which came out a more blue/grey colour, for the ammo pouches and haversack I used 'Early WW2 Field Grey' which is a more Green/blue/grey. Neither were quite what I expected. The smock is painted in the 'Splinter' colours. The helmet I painted in Vallejo 'Field grey' which is a more green/grey colour, and then sponged on desert yellow, to represent the sand colour sprayed onto late war FJ helmets.

Overall I like the foundry range (this being the first time of used it), and will be buying more colours. I haven't been entirely accurate with colours, e.g. the ammo pouches were a more darker grey, as should be the base colour of the helmet. But I figured late in the war, shortages and all.

Anyway, plenty more to paint. Once the camo smock is done the rest of the figure is fairly straight forward. At present I'm still concentrating on WW2, with the intention of splitting the painting between US and German Airborne, vehicles and terrain to keep the interest going.

The figure is from the excellent Artizan Designs range.

Wednesday, 1 June 2011

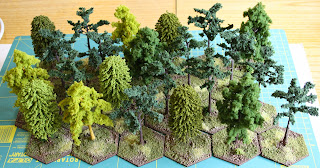
More Trees!

Just a quick post. Haven't got alot done over the past 7-10 days, work, family , blah. blah! You get the picture. But I did get these finished.


More trees for my 28mm games, or these can be used for 15mm. Again based on 60mm hex bases, from Warbases. These were pre-made trees and I had purchased them for use in FOW games, but they will work well for 28mm. This gives me a further fifteen bases to use.

I did start my 28mm Fallschirmjager, or a test figure at least but just not happy with the way the camo smock came out, so I too embarrassed to show it (damn pride). Will start again when I get back off a short break.

Sunday, 22 May 2011

Tools of the Trade-MIG Filters

MIG Productions filters have become my one of my favourite products, for enhancing the appearance of model vehicles, and I've only used them so far on two different tanks.

I purchased the Allied and German filter sets after reading several reviews on the 'net', all of which spoke highly of this product. So far I have only used the Allied filter set. I got mine from Antenocitis Workshop. They are not cheap at £15.99 a set, in which you get three bottles. But I think worth the investment.

The filter should be applied after the initial base coat(s) have been applied and 'is used to enrich, unify and cause variations in the tone of a base colour'. And that's basically what they do. I just followed the instructions supplied in the packaging, and away I went. On the M5A1 I used just the BROWN filter for dark green and applied three coats. After the first coat I didn't notice any appreciable difference, but by the third coat you can see the filter taking effect, altering the tone of the paint. On the M4 Sherman I applied two coats of GREEN for light green and then one of BROWN, to slightly darken the overall effect.

The instructions recommend, 3 to 5 coats of the filter and allow at least two hours drying time between coats (it's worth it!). One aspect I struggled with initially with the filter is the idea it is not a wash.The filter should be applied with a damp brush, do not flood the model. Now on the Sherman I experimented with applying the GREY filter for bright green, on select areas, but I loaded the brush to much which resulted in 'pooling' and this looked messy when dry. I was able to re-work this, but was glad it was only on a small area. So far on each model I have coated the whole model (except tracks of course), but will experiment no doubt on future projects but adding successive coats to specific areas to see what effect this has on the appearance of the model. For example, using a couple of coats of GREEN filter overall, and then using the BROWN filter on parts of the tank, were the paint fading may not be so distinct (areas under shade).

These products are aimed at the 1/35th scale model tank society, but can obviously be applied to any scale. For further articles which can provide help, advice and inspiration look to Missing-Lynx and Armorama. Looking forward to trying out the German set. (I wonder how the German BROWN for dark yellow would work on an Allied green.....?).    

Thursday, 19 May 2011

M4 Sherman

A second edition to support my US Airborne. A late production M4 (welded hull with a cast nose and wider gun mount).


The M4 or Sherman is probably the best known of all of the Allied tanks from WW2. Over 40,000 (including variants) were built. It may be dismissed, by historians (both professional and arm-chair), it may not have been up to the standard of some of the German and Soviet designs (particularly late war designs), but there were lots of them and it was reliable, easy to maintain (unlike the German Panther) and the up-gunned versions (in particular the British Firefly), gave it a little bit more of a fighting chance against it's opponents. This version is mounting a 75mm main gun, 2x .30 cal machine guns and .50cal machine gun for AA defence.
    

This model is from JTFM and once again I picked up my copy from Wargames Command Post (incidentally Bob from WCP has posted today on TMP that he will no longer be stocking JTFM products). This M4 is originally a Chieftain models master, and the detailing is superb. The model is resin, and only the .50cal on the turret is metal. You get the hull, turret and tracks. The tracks have a lug which fits snuggly into the hull. The commanders hatch comes as a two piece cast, allowing it to be modelled open or closed and this is my only gripe with this model. The two pieces did not fit very well, despite there being  a lip on the inside of the open hatch hole. I had to cut a small piece of circular card and place that inside the opening, glue the hatch covers on top of that and then used 'green stuff' to give it a more secure looking fit. The kit comes with about twenty pieces of resin stowage, none of which I used you will notice.


This beauty has been painted/weathered in much the same way as the M5A1. Except I also sprayed Tamiya Khaki on it but only on select areas to give the appearance of faded paint. I also used two of the MIG filters on it, which resulted in a greener/brighter appearance (I'll put up separate posts soon about the filters etc. for those who are interested). The aerial is a plastic broom bristle.

I did not put any stowage on the model because I wanted to paint it first and then add the stowage. I did the same with the M5, then painted and glued on the stowage. But after completing the Sherman I quite liked it 'clean' so left it as you see it. I may add stowage in the future, but not just yet.

Here is comparison shot of the M4 and M5 to get an idea of size.


Both of these models are 1/56th scale. 

Wednesday, 18 May 2011

M5A1

Some light armoured support for the US Paratroopers. An M5A1 Stuart light tank.


The M5 light tank was a replacement vehicle for the M3 light tank, and was introduced in September 1942. It boasted a 37mm main gun, and up to three .30cal machine guns (one for AA defence). The tank had a maximum speed of 36mph, maximum cross country speed of 24mph. ( A Panzer IVH max speed of approx 23mph (road)).

A US tank battalion consisted of four companies (1944), three companies A-C had M4 (Sherman) tanks and the Company D was equipped with the M5. The Light Company had  17 tanks, 5 in three platoons plus 2 command vehicles.

The M5 was itself replaced by the M24 (Chaffee). The M24 first saw service in November 1944, but the M5 was still in use by the end of the war.


This model is from Company B and I picked mine up from Wargames Command Post (excellent service, recommend WCP). The hull and turret are resin and the tracks, main gun, machine guns, and headlights are metal fittings. The stowage is a mix of Company B and Bolt Action (but they don't seem to do the same range anymore) and I think ebob. The decals are also from Company B.


The model was sprayed black and airbrushed with Tamiya colours (Olive Drab & Khaki Drab), then I applied a MIG filter, from the Allied set. Then the vehicle was weathered, paint chips applied with a sponge (the packing from a model blister pack), oil paints, GW washes, thinned GW paints, Forge World weathering powders. Stowage painted mainly with Vallejo colours. Several layers of varnish between stages, and a final matt varnish with Daler-Rowney matt varnish applied with the airbrush. This model was about 98% completed a month ago but only just got round to finishing it off.

The M5 may not be the sexiest tank from WW2, or the deadliest, but it was used by the USA, Britain and USSR. It saw service in Europe and the Far East, were it was probably better suited against the Japanese tanks. It also represents my preference for that bit of realism in games, I try and avoid the WW2 gamers (some of them anyway ( particularly German players!)) obsession with having the biggest and best tank, anti-tank gun etc..

Next up the M4.

Monday, 2 May 2011

Disposable Heroes & Seven Coffin for Seven Brothers

The WW2 rules of choice at the moment are Iron Ivan Games 'Disposable Heroes', an infantry and vehicle small unit skirmish game.

These rules are what I would term 'fast play' but with enough detail to add that level of 'realism' to make them that bit more interesting.

Primarily they are an infantry focused rule set. Vehicles when used should be there to support  the infantry units not to charge around the battlefield and dominate it like the heroes from the Illiad.

The rules have some interesting abstract mechanics, such as infantry are not slowed down by terrain, so for example a squad running (which can move 9" in 28mm games) does not have to deduct an inch here for jumping a wall, 2" there for entering a building. This may go against the norm for miniature wargames, but terrain does then effect line of sight, and firing at a target over linear obstacles attracts a penalty. Of course with particular terrain features such as a marsh then players can impose their own movement penalties if you wish.

Turns are initiative based, with one player moving a unit then his opponent, then the first player and so on. Each activated unit can move and fire or fire and move. With firing another abstraction is that only a half a squad (section) may fire. This is to represent the 'confusion' of combat i.e.  team members may be reloading, observing etc and so do not engage the enemy. This was one rule which I personally had a issue with, to use to rules in which everything can 'blaze away', but having played a few games, I now quite like it.

Morale is important in this game, with units having to take a morale check (referred to as a Guts check), even when fired on and no casualties caused. This system throws in a level of uncertainty, and generally does not cause that much of a problem (unless its me throwing the dice, and I have my appalling run of bad luck).

Vehicles are not the metal monsters of some games, but still have to be accounted for, but they should be protected by infantry in order to be truly effective. The rule writers have tempered vehicles (i.e. tanks) by requiring them to make an acquisition roll to spot a target. This effectively stops AFV's charging round the games table, blasting everything in sight. A frustrating rule but again one I like, and it must be remembered this a small unit game. It is not designed to represent the armour clash at Prokhorovka. The designers recommend if you want to play armour battles remove the acquisition rule.

Indirect fire, like vehicles, is not that effective ((generally) though have only used on table mortars in games so far) but is there more to annoy your opponent and give them something to think about. These rules do place emphasis on movement and not staying static. To do so attracts unwanted attention which may find your units suffering morale checks and the battle plan going awry.

Using cover effectively, reduces the impact of fire combat (but remember morale), yet if hits are scored then 'kills' are pretty much guaranteed.

The rules are supported by excellent supplements for the main combatants (designed for mid to late war games), and though the lists contained within the supplements are points based, it's not necessary to play these rules and be a slave to an army list. Supplements also exist for Early War and the War in the Pacific, neither of which I have but will probably be purchasing.

Have played a few games recently and 'after actions reports can be found here wargamesbutterfly and here wargamesbutterfly. Posted by the dashing Mr R, who at the moment leads to 2 to 1 on the victory counter.

Wargames rules come and go and WW2 rules in particular seem to be easy victims to the fickle nature of gamers. At the moment for me these rules score an 8.5 out of 10 (theres always something which an individual does not agree with ) and personally I would like to keep as rules of choice for a while. As an indication prior to this had be playing the Rules of Engagement set from Great Escape Games. These borrowed heavily from the GW style of games ( I believe the designers are ex-GW staff?). Though comprehensive rules I found them at time 'clunky' and time consuming and score them a 5 out of 10 for playability. So give DHC7B ago, see what you think. 

Sunday, 1 May 2011

Making Hedgerows. Part 4

Another week of terrain making. More hedgerows.


Fourteen more straight sections, two more corners, one more T-junction, and one 'crossroad' section. With the addition of these pieces it means I have a total of twenty eight straight sections, so that should be enough hedgerows for the moment.

I may add in more corners, t-junctions in the near future and would like to model some gate/open sections. Openings can be represented by just leaving gaps between the sections but for aesthetic value, model gateways will look better. But for now I'll move on to some different terrain.

Saturday, 23 April 2011

Off The Bookshelf

With the Old Breed by Eugene Sledge - I must admit I read this off the back of watching the HBO series The Pacific'. It's an excellent read. Sledge doesn't pull any punches in his description of the fighting on Peleliu and Okinawa, or more importantly the descriptions of the conditions the Marines lived in.

Like the Band of Brothers TV series, the series does take certain liberties altering or merging certain events. For example, the scene of Peleliu when Snafu is throwing small stones into the open brain cavity of a dead Japanese soldier. Sledge does not  name the individual who actually did that, so unless the series writers or producers were privy to information I am not aware of, it could or could not been Snafu. When on Okinawa and Sledge is digging a foxhole only to find a corpse at the bottom, the event described in the book is far more graphic and horrific.

For myself I certainly felt that despite the fact that Sledge alludes to the waste of war, in terms of human misery and suffering, on both sides. He certainly does not demonstrate remorse over the killing of Japanese soldiers, during the conflict. His approach is similar to many accounts of veterans of WW2 in that 'they' were the enemy, and 'they' would kill you unless you got in first. Also a sense of pride comes through in having served in the US Marine Corp. Though he is critical of individuals on occasion ie certain officers, Sledge does not enter into the realm of criticising strategy, it literally is just an account of how he saw things, his war. 

If you're interested in the Pacific conflict then I fully recommend this book. A great read, and from a wargaming point of view certainly got me thinking about starting a Pacific project. But not yet!     

Friday, 22 April 2011

Trees!!!!!!

So here's a little clue how I have spent the last week, when not enjoying the glorious weather of course!


That's right basing trees. These are for 28mm games, and I've decided to base them all individually, on 60mm hex bases from....Warbases. In all there are currently twenty three of them (odd number, not sure why 23?). These trees are about twenty years old give or take a year or two, and had been sitting up in the loft for a while. I used to put the trees on to a piece irregularly cut green felt to represent the border of the wood. I had planned on making some area bases out of 3mm MDF painting and flocking it and basing the trees on to a small suitable base (a 2p coin for example) and then placing them onto the larger area base.

But I decided to use the hex bases instead. Not my original idea, but I like the effect it gives, may not be to everyone's taste with the straight base edges. This way an area of a wood can still be represented, or they can be used as individual trees. Also means less to carry around and store.

The same paints and flocks have been used as on the hedges I made. I have some 15mm sized trees to base which I will see if two or three can go on a single base. They should work with the larger trees, to give variation in height for a wood in 28mm games.  May also make some 'empty' bases, so the wood area can be defined when figures are placed into the wood itself, and trees removed for ease of play.     

Sunday, 10 April 2011

Making Hedgerows. Part 3

Another week of terrain making as passed by. Here's what I have to show for the hard work over the past few nights.

These are corner and T-junction pieces. Made in the same way as the straights, but smaller. I had considered, using the longer straight lengths and placing the corner/T-junction on each. But this would potentially have meant making more corner pieces, since a left corner, for example, could not be reversed to be used as a right corner.

So I used 40x40mm MDF bases instead, once again from Warbases. The corner pieces are now multi-functional. I've only made four corners and two T-junctions at the moment, but they work okay. Here's an example...
I've also made a further seven straight sections.

These are exactly the same size as the other bases. Not really clear in the picture but on these seven the foliage is slightly higher, to make it more hedge like. The foliage on the first set of bases does look a little low in places.

I  figure that I will need to make at least double the amount of straights to what I currently have to be able to cover a good sized area. A few more corners and a couple of 'crossroad' type bases for good measure.

Wednesday, 30 March 2011

Making Hedgerows. Part 2

Here we have the bases painted in a suitable earth colour. I say a suitable earth colour but I'm not actually sure it is, its various shades of brown. I used Anita's acrylic craft paint. Starting with Burnt Umber and then building up through lighter shades of brown and finished off with a sand colour brushed lightly over the base. I picked mine up from Hobbycraft. But I'm not sure they sell Anita's anymore but they do have a couple of other ranges in stock, which are similar. For painting terrain I think they are perfectly suitable.

At this point I was much happier with the appearance of the bases, and next was to add the foliage and grass. The finished product....


The hedges are made from Woodland Scenics foliage clusters, with some clump foliage added in a lighter colour, Jarvis scatter fine turf, Silflor flowers and static grass which is from GW. The foliage, flowers and turf come from antenocitisworkshop. Though the clusters I had to get from maelstrom games since they were out of stock at Antenocitis. The clusters are just that. It is the same or a very similar material as the foliage clumps but more tightly packed, which makes it ideal to use for large bushes. 

The above image hopefully gives an idea what the bases look like together. The next image gives an idea of scale.

The figure behind the hedge is an Artizan designs 28mm WW2 US Airborne rifleman. Obviously you cannot tell from the picture but the figures base is butted up against the hedge base. For the record the model is based on a 2p coin.

With the foliage and scatter added, I sprayed the bases with Woodland Scenics scenic glue, using the handy spray top from the aptly named Scenic Sprayer. (The foliage and scatter was glued on first with either PVA or Woodland Scenics hobby tac glue). Once the second layer of glue was dry I sealed the hedges with Games Workshops Purity Seal spray varnish.

Overall I'm pleased with the result but would change a couple of things. Firstly, the cork ridge I should have made slightly wider, perhaps only about another 5mm. This would have meant I could have put wider clumps of foliage on top, filling out the hedges a bit more. Also made the bevel on the edges of the cork steeper in places, to make the slope more pronounced. I might also try not to 'spot' the static grass onto the base next time. In the photos it looks odd on top the turf (well to me anyway).

Next to make more straights, corners, T-junctions and gateways/openings. The MDF bases work fine and I'm hoping the same size base will serve for making bocage.  

Saturday, 26 March 2011

Making Hedgerows. Part 1

One of my aims this year is to make as much terrain as I can myself. Making the few pieces I did last year I actually found quite enjoyable, so over the past few days, I've started another terrain project.

This time its 28mm hedgerows. Even though my interest in WW2 gaming centres around the Normandy campaign I decided to make non-bocage hedgerows, which will hopefully be generic enough for other periods/regions.

The purpose of these post(s) will be to record the building process, more so I can identify what works and what does not. First off was what to use to base the hedges on? This question was answered by looking round for what I had available. What I had was plenty of pre-cut MDF bases from Warbases. I had purchased these to use to make bocage hedgerows for 15mm games, but I think they should work well for 28mm.


These bases are 120mmx40mmx2mm and there are seven in a pack. On top of them is cork tile. I had some off cuts of cork tile lying about. So I cut lengths, about 10mm wide, and then further broke that into shorter lengths, and used wood glue to stick it to the base. My original idea was to use the cork, to bulk out the foliage which was to be placed  on top, so it would be hidden. But then I decided to use it to represent a low bank. So I also cut up some slightly wider pieces, to hopefully give that illusion. I had considered, only placing a few pieces on each base so the height of the foliage would vary along each length. But again I changed my mind and laid the cork along the whole length. Since it had been broken into pieces I was able to place it out in an irregular fashion, so the bank would not be to linear. I further placed a few pieces on top of the first layer to give that variation in height. The cork tile was also bevelled using a craft knife, which I was not to exact with since the next stage would hide this.
      
Next was to cover the base in sand. In this case a mix of sand and gravel. This is a mix I made up a long time ago from sand and gravel purchased from a pet shop. At this point I was not to sure that these bases would work. But decided to stick with it. 

Now the bases have been undercoated with GW Chaos black spray. GW spray may be a little expensive to use to undercoat terrain, but its all I've of got at the moment, and it does give good coverage.

So that's where I'm at. Next it will be to paint and add the flock and foliage.    

Saturday, 12 March 2011

Off the Bookshelf

This is something I've wanted to do for a while an infrequent little column about what I'm reading or have just read recently. It will probably give clues to what is interesting me the world of wargaming as well. Obviously it will be my opinions only for good or bad. First up....

Monte Cassino by Matthew Parker.  Not a new book I know and my paperback copy has sat on the bookshelf  for probably nearly two years before I finally got round to read it. The quote on the front cover just about sums up this book. It is one of these rare history books which, you cannot put down. Very, very good. 

Monte Cassino is probably one of those battles, which has fascinated me since childhood, and I've read various accounts, and watched documentaries on the subject, but this is the first time I could actually recall reading such a compelling account. Parker does not pull his punches with graphic descriptions of the battle(s), largely drawn from first hand accounts of survivors and some times from accounts of those who did not survivor the battle.

The narrative switches back and forth between accounts of the British/Commonwealth and American assaults to take the town and the monastery. But also covers in some detail the French attacks, which may have succeeded in flanking the monastery, and thus preventing the bloody stalemate which developed,  if they had been given more support. Within all this are stories concerning the Gurkha's, Indian's, New Zealanders and of course the Polish troops who eventually captured the monastery. Accounts by Italian's and the German defenders are all included.

If I was to be critical, I would have liked more accounts from the German defenders, these seem to be lacking, even though Chapter 14 is titled Green Devils of Cassino. The first half of the chapter relates to accounts from the German paratroopers defending Cassino and then switches to Allied accounts again. Admittedly every book can only include so much, but this account could have easily had a further 100 pages added or more and it would not have slowed up the narrative.

If you're interested in World War Two history and in particular the Italian campaign, then buy this book and read it. I bought my copy from amazon. With Afterthebattle  due to release Monte Cassino Then and Now, I'm looking forward to adding a copy to my collection to continue my study of this campaign.

Friday, 11 March 2011

Blast from the Past

Its been a bit slow on the painting front over the last couple of months, but have got some figures painted and not what I expected to paint either!

World War 2 US Paratroopers in 28mm. (Can you believe it!). First up two more riflemen. I haven't touched these models for at least eighteen months, which is a shame since when I started this project it was the first time for a long time that I felt quite passionate (steady on!) about painting. But that's not all....


A 60mm mortar and crew to add much needed fire support to the platoon (the bottom photo is an action shot).
All figures are from Artizan designs. I still have quite a few more.

Like so many other projects, these figures had been based and undercoated and lying forlorn in a box. I had planned on painting a few of the Zulu War cavalry, but had a change of heart, mainly because I have the colour scheme for the Para's planned out. When starting on a new range/period I like to do a test figure first, so I'm happy with the colours to be used. Knowing time was going to be a premium for a while I decided to turn to a tried and tested collection. I'm glad I did. 

Admittedly painting these Airborne has renewed my interest in 28mm WW2 again. Plus also the club is trialing 'Troops, Weapons & Tactics', which I think may have potential of providing a good game. Hopefully I will get a game in soon. For now this link Eveshamwargames, gives a brief mention to the game and a quick plug for the club. 

2011 will be a frugal year on the wargame buying front, (thank you coalition government!) but on the bright side I intend to concentrate on ongoing projects ie reducing the proverbial 'lead mountain' . 28mm WW2 being one of them. After all it was because of this project that I decided to join a club again.      

Friday, 14 January 2011

Return of the Apache

I've managed to add two more Apache Warriors to my small but growing war party, for use in Legends of the Old West.

 Both of these warriors are armed with Winchester repeating rifles, and will add much needed fire power to the Apache posse.

These look a bit garish since I had to use the flash. I need to invest in a halogen lamp which I've read should be used to assist in lighting figures if the natural light is poor.

These models like all others are from the wargames foundry range. 

Monday, 3 January 2011

On the Workbench

Another quick update. This is what has kept me occupied for the last couple of days.
Auxiliary cavalry for the 1879 Zulu War. Cleaned up and based fourteen mounted figures and fourteen dismounted figures over the weekend, and then gave then a coat of Chaos Black spray. In this little lot are;  Natal Mounted Police x4, Natal Carbineers x4, Buffalo Border Guard x2, Newcastle Mounted Rifles x2, Auxiliary Officer x1 and LtCol Durnford x1.  These are once again empressminiatures figures. The oval bases which the cavalry are mounted on are from warbases. Picked them up at the Reading show last year.

I suspect the next couple of months are going to be busy so I'm not sure how much painting I'm going to have time to do. But with these based and primed, at least I get on paint them when I do find the time.

A belated Happy New Year to you all. I'm not one for making New Year Resolutions. When I have done so previously I tend to either forget them or never full fill them as the year goes by. At the moment though if I had to make one resolution, okay maybe two...DO MORE PAINTING and STOP BUYING MORE FIGURES. Lets see what happens as the year goes by.